

Have you ever stood in front of a wall-mounted soap dispenser, unsure how to open it without causing damage? Whether you need to refill it or clean it, knowing the right way to open your soap dispenser can save you time and frustration.
In this guide, you’ll discover simple, step-by-step tips that make the process quick and hassle-free. By the end, you’ll feel confident handling your dispenser like a pro—no more guessing or struggling. Keep reading to unlock the easy method to open your wall soap dispenser smoothly every time.
Types Of Wall Soap Dispensers
Wall soap dispensers come in various types, each designed to fit different needs and preferences. Understanding these types can help you choose the right dispenser for your space and make opening or refilling it much easier. Let’s break down the common types you might encounter.
Manual Dispensers
Manual soap dispensers require you to press a lever or pump to release soap. They are straightforward and usually less expensive. If you prefer a simple, no-fuss design, manual dispensers are a solid choice.
Opening these dispensers often involves twisting or lifting the top part. Have you noticed how some models have a locking mechanism? It can be a bit tricky at first, but once you understand it, refilling becomes quick and hassle-free.
Automatic Dispensers
Automatic dispensers use sensors to dispense soap without any physical contact. This touch-free feature is especially useful in public or busy areas to reduce germ spread. They usually run on batteries and have a compartment for refills.
Opening an automatic dispenser sometimes requires a key or button release to prevent tampering. If you’ve struggled with these, try locating the release point near the bottom or back. Keeping the manual handy can save you time when you need to refill.
Refillable Vs. Sealed Units
Refillable dispensers allow you to add liquid soap from a bottle or bulk container. This option is cost-effective and environmentally friendly since you reuse the same unit. Most refillable models are designed to open easily for quick soap topping.
Sealed units come pre-filled and are replaced entirely once empty. They offer convenience and consistent hygiene but can be more expensive over time. Have you considered how often you want to replace the entire unit versus just refilling?
Tools Needed For Opening
Knowing the right tools to open a wall-mounted soap dispenser can save you time and prevent damage. The tools you need depend on the dispenser’s design and how it’s installed. Sometimes, the simplest tools from around your home will do the job perfectly, but other times, you might need something more specialized.
Common Household Tools
You’d be surprised how often common items like a flathead screwdriver or a pair of pliers come in handy. Many soap dispensers have small screws or clips that hold them in place, which these tools can easily loosen.
Other useful tools include:
- A Phillips screwdriver for crosshead screws
- A utility knife to carefully cut seals or tape
- A cloth or rubber gloves to improve grip and protect your hands
In one instance, I used a butter knife to gently pry open a stuck dispenser cover when I couldn’t find my screwdriver. This quick fix avoided any damage and got the dispenser open without hassle.
When To Use Special Tools
Some soap dispensers require unique tools, especially those with security features to prevent tampering. If your dispenser has a lock or a custom fastening system, a specialized key or tool from the manufacturer might be necessary.
Consider these situations for special tools:
- Dispenser covers secured by a locking mechanism
- Units mounted with hidden screws or clips
- Models designed for commercial use with non-standard fittings
Have you ever faced a dispenser that just wouldn’t budge? Sometimes, investing in the right tool upfront saves you from frustration and potential damage. Check your dispenser’s manual or manufacturer’s website to see if they recommend any specific tools before you start.
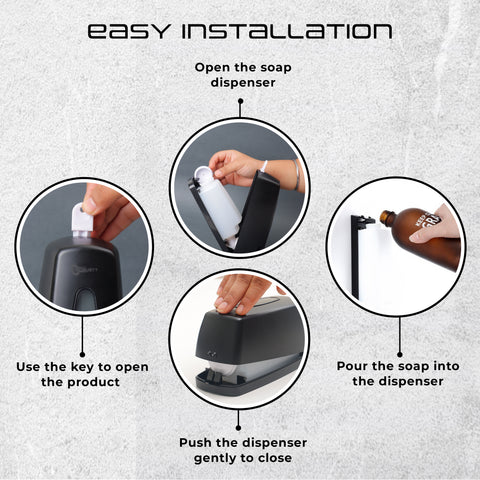
Step-by-step Opening Guide
Opening a soap dispenser on the wall can seem tricky. This guide breaks down the process into simple steps. Follow these clear instructions to access the soap reservoir safely and easily. No special tools are needed for most dispensers. Just a little patience and careful handling.
Locate The Release Mechanism
Most wall-mounted soap dispensers have a release button or latch. It is usually near the top or on the side. Look closely for a small notch or button. Sometimes, a key is needed to unlock it. Check the dispenser’s manual if unsure. Press or slide the release to unlock the cover.
Remove The Cover Or Lid
After unlocking, gently lift or slide the cover off. Avoid using force to prevent damage. Some covers lift straight up, while others swing open like a door. Keep the cover in a safe place to avoid losing it. This step gives full access to the inside of the dispenser.
Access The Soap Reservoir
The soap reservoir sits beneath the cover. It may be a removable container or a fixed tank. Remove the reservoir carefully if it is detachable. Clean or refill the reservoir as needed. Check for any blockages or leaks. Replace the cover securely after maintenance.
Credit: www.robustt.in
Tips For Safe Handling
Opening a soap dispenser on the wall can seem like a straightforward task, but it often requires careful handling to ensure the dispenser remains in good condition and functions properly. Safety is key, not just for the dispenser but for you as well. By adopting smart practices, you can avoid unnecessary hassles and maintain a hygienic environment.
Avoiding Damage To The Dispenser
- Before attempting to open the dispenser, take a moment to inspect the unit. Look for any visible screws or latches that may need loosening.
- Use the appropriate tools; a screwdriver can be handy, but avoid using excessive force that might crack or damage the plastic.
- Once opened, gently remove any internal components like the soap cartridge or pump mechanism. This prevents breakage or misalignment, ensuring the dispenser operates smoothly.
Cleaning Before Refill
- Cleaning the dispenser before refilling is crucial for maintaining hygiene. Use a mild soap solution or disinfectant wipes to clean the interior and exterior surfaces.
- Pay special attention to the nozzle area, where soap residue can build up, leading to clogs or bacterial growth.
- Allow the dispenser to dry completely before adding new soap to prevent dilution or contamination of the fresh soap.
Have you ever struggled with a sticky soap dispenser nozzle? It’s often due to residue buildup. Regular cleaning can save you from this frustration and ensure a smooth dispensing experience.
Troubleshooting Common Issues
Opening a wall-mounted soap dispenser can sometimes be tricky. Certain problems often block easy access. Understanding common issues helps fix them quickly. This section covers typical troubles and simple fixes. It ensures smooth soap refilling and dispenser use.
Stuck Covers
Covers may stick due to soap residue or tight seals. Warm water softens hardened soap around edges. Use a cloth soaked in warm water to wipe the cover. Avoid using sharp tools to pry the cover open. Gentle twisting or pushing might release it without damage.
Broken Locks
Locks can break or jam, stopping the cover from opening. Check for visible damage or stuck parts inside the lock. Use a small screwdriver to gently move stuck components. If the lock is broken, consider replacing it for security. Temporary fixes include taping the cover until repair.
Refill Difficulties
Refilling troubles arise from narrow openings or leftover soap inside. Clear old soap with warm water and a soft cloth. Use a funnel to pour soap into small openings easily. Avoid overfilling to prevent spills and clogs. Clean the refill area regularly to keep it smooth.
Maintenance For Longevity
Maintaining a wall-mounted soap dispenser helps it last longer and work better. Regular care keeps it clean and prevents damage. Small checks and cleaning steps save money and time. A well-kept dispenser looks nice and works smoothly every day.
Regular Cleaning
Clean the dispenser often to stop soap build-up and dirt. Use a soft cloth with warm water and mild soap. Wipe both inside and outside surfaces gently. Avoid harsh chemicals that can damage the dispenser’s material. Dry the dispenser fully to prevent mold or rust.
Checking For Wear And Tear
Look for cracks, leaks, or loose parts regularly. Check the pump mechanism to ensure it works without jamming. Replace any broken or worn parts quickly. Tighten screws and fittings if they feel loose. Early fixes keep the dispenser safe and functioning well.

Credit: www.youtube.com
Frequently Asked Questions
How Do I Open A Wall-mounted Soap Dispenser?
To open a wall-mounted soap dispenser, locate the release button or latch. Press or slide it gently. Some models twist off the top. Always check the manufacturer’s instructions for specific steps.
Can I Open Soap Dispensers Without Tools?
Yes, many soap dispensers open without tools. Usually, you press a button, slide a latch, or twist the cover by hand. Avoid using sharp objects to prevent damage.
Why Won’t My Soap Dispenser Open?
If your soap dispenser won’t open, it might be locked or stuck. Check for a locking mechanism or dried soap residue. Apply gentle pressure or use a cloth to grip better.
How To Clean A Soap Dispenser After Opening?
After opening, empty any remaining soap. Rinse the container with warm water. Use mild soap and a soft brush to clean internal parts. Dry thoroughly before refilling.
Conclusion
Opening a wall soap dispenser is easier than it seems. Just follow the steps carefully and gently. Use the right tools to avoid damage. Regular cleaning keeps your dispenser working well. Now you can refill or fix it quickly. A simple task that saves time and money.
Try it yourself and keep your bathroom neat. No need to call a plumber for this small job. Practice a few times, and it will feel natural. Simple tips make home care less stressful and more efficient.