

Are you tired of messy soap bottles cluttering your kitchen sink? Installing a kitchen sink soap dispenser can make your cleaning routine smoother and your countertop tidier.
You don’t need to be a handyman to do it yourself. In this guide, you’ll discover simple, step-by-step instructions that anyone can follow. By the end, you’ll have a sleek, built-in soap dispenser ready to use every time you wash your hands or dishes.
Keep reading to transform your kitchen with this easy upgrade!
Credit: www.aliexpress.com
Tools And Materials Needed
Installing a kitchen sink soap dispenser is a simple task with the right tools and materials. Proper preparation saves time and avoids frustration. Gathering everything before starting helps the process go smoothly. Below are the key items needed for installation.
Essential Tools
- Adjustable wrench for tightening nuts
- Screwdriver, usually Phillips or flathead
- Measuring tape to check space and fit
- Utility knife for cutting sealant or tape
- Bucket to catch any water drips
- Towel or rag for cleanup
Choosing The Right Soap Dispenser
Select a soap dispenser that fits your sink’s hole size. Most sinks have a standard hole of 1 to 1.5 inches. Choose a dispenser with a refillable bottle large enough for your needs. Consider finishes that match your faucet, like chrome or brushed nickel. Simple designs work best for easy use and cleaning.
Additional Supplies
- Plumber’s putty or silicone sealant to prevent leaks
- Soap or detergent compatible with the dispenser
- Replacement parts like gaskets or washers if needed
- Instructions manual from the dispenser manufacturer

Credit: www.facebook.com
Prepare The Sink Area
Preparing the sink area is crucial before installing your kitchen sink soap dispenser. A well-prepped space makes the installation smoother and helps avoid unexpected hiccups. Taking time here saves you frustration and ensures everything fits perfectly.
Clear The Workspace
Start by removing any items around and under the sink. Clearing the area gives you full access and prevents accidents. You don’t want to knock over cleaning supplies or tools while working.
Make sure the countertop is clean and dry too. This will help you spot any potential issues like cracks or leftover debris that might interfere with the installation.
Turn Off Water Supply
Before touching anything under the sink, locate the water shutoff valves and turn them off. This step protects you from unexpected leaks or water damage.
Double-check by turning on the faucet to confirm no water flows. Have a towel or small bucket handy just in case some water drips when you disconnect parts.
Remove Existing Components
If your sink has an existing soap dispenser or an unused hole plug, remove them carefully. This often involves loosening a mounting nut from beneath the sink.
Use a flashlight to get a good view and a wrench or pliers for tight spots. Be patient; these parts can be stubborn, especially if they’ve been in place for years.
Have you noticed how small details like a hidden mounting nut can slow you down? Spotting these early helps you plan the tools and time needed for the job.
Install The Soap Dispenser
Installing a kitchen sink soap dispenser makes handwashing and dishwashing easier. The process is simple and requires only a few tools. Follow these steps to install the soap dispenser correctly. This ensures it fits securely and works smoothly.
Drill The Mounting Hole
Choose a spot near your sink for the dispenser. Use a drill with the right bit size. Drill a hole through the countertop carefully. Make sure the hole matches the dispenser’s base diameter. Clean any debris from the hole to avoid damage.
Insert The Dispenser Pump
Take the dispenser pump and insert it through the hole. The pump head should sit above the countertop. Push it down gently but firmly. Ensure the pump stem goes fully through the hole. This helps the dispenser stay stable during use.
Secure The Dispenser Base
Underneath the countertop, slide the mounting nut onto the dispenser stem. Tighten the nut by hand first. Use a wrench to make it snug but not too tight. Check that the dispenser does not wobble. Finally, attach the soap bottle to the pump from below.
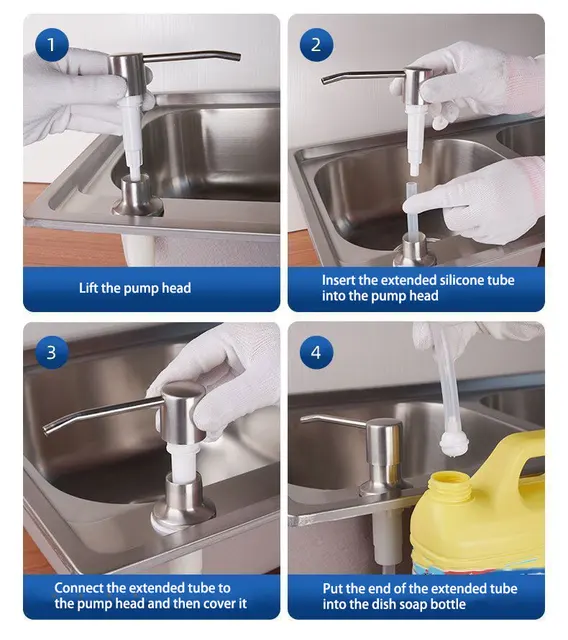
Connect The Soap Bottle
Connecting the soap bottle is a crucial part of installing your kitchen sink soap dispenser. This step ensures the soap flows smoothly from the container to the pump, making your dispenser functional and convenient. Let’s break down the process into simple actions that anyone can handle.
Attach The Soap Container
First, secure the soap container under your sink. Most containers have a threaded neck that fits snugly into the dispenser’s base. Screw it tightly by hand to avoid leaks, but don’t overtighten—plastic threads can strip easily.
If you’ve ever struggled with a loose bottle that wobbles, you know how annoying it can be. A firm attachment keeps everything steady and extends the life of your dispenser.
Connect The Tube To Pump
Next, connect the clear tube from the soap container to the pump on the dispenser. The tube usually slides onto a small nozzle or nipple on the pump. Push it firmly to ensure a tight fit, or the soap might drip or fail to pump correctly.
Check the tube’s length before connecting. If it’s too long, it might kink, blocking soap flow. Too short, and it won’t reach the bottom of the container. Adjust it carefully for smooth operation.
Fill The Soap Reservoir
Finally, fill the soap container with your preferred liquid soap. Use a funnel to avoid spills, especially when working under the sink in tight spaces. Filling it just below the top prevents overflow when you insert the tube.
Think about what soap you want to use—thicker soaps may clog the pump, while very watery ones might leak. Testing a small amount first helps you find the perfect consistency for your dispenser.
Test The Dispenser
Press the dispenser pump several times to check soap flow. Ensure no leaks or blockages appear under the sink. Adjust the soap level and tighten connections if needed.
Testing your newly installed kitchen sink soap dispenser is a crucial step to ensure it functions smoothly. After all, what’s more frustrating than needing soap and finding an empty or malfunctioning dispenser? This process will help you confirm that your setup is leak-free and operating efficiently, allowing you to enjoy the convenience of having soap at your fingertips. Let’s dive into the essential steps to test your dispenser effectively.Prime The Pump
Start by filling the soap reservoir with your favorite liquid soap. This might seem straightforward, but the type of soap can affect how well your dispenser works. Avoid using soaps that are too thick, as they might clog the pump. Once filled, press the dispenser pump several times to prime it. You may notice it takes a few pumps before the soap starts to dispense. This is normal as air trapped in the system needs to be released. Feel the satisfaction when the first dollop of soap emerges. It’s like the first drop of rain after a long dry spell. Now, your dispenser is ready for action.Check For Leaks
Inspect the area around the base of the dispenser. Even the tiniest leak can lead to bigger problems over time, such as soap residue build-up or damage to your countertop. Run your fingers around the joints and fittings to ensure everything is snug. Sometimes, a simple tightening of a loose screw is all it takes to fix minor leaks. Consider if you need to add a sealant for extra protection. This small step can save you from messy surprises later.Adjust For Smooth Operation
Does your dispenser pump feel stiff or too loose? Adjust the pump mechanism to get that perfect balance. A pump that’s hard to press will frustrate you, while one that’s too loose might dispense soap unexpectedly. Test the force needed to dispense soap. You want it to be easy but controlled. Imagine the ease of operation during busy cooking sessions. This adjustment ensures your dispenser serves you well without fuss. By testing your kitchen sink soap dispenser thoroughly, you’re setting the stage for a hassle-free kitchen experience. Who knew a simple soap dispenser could make such a difference?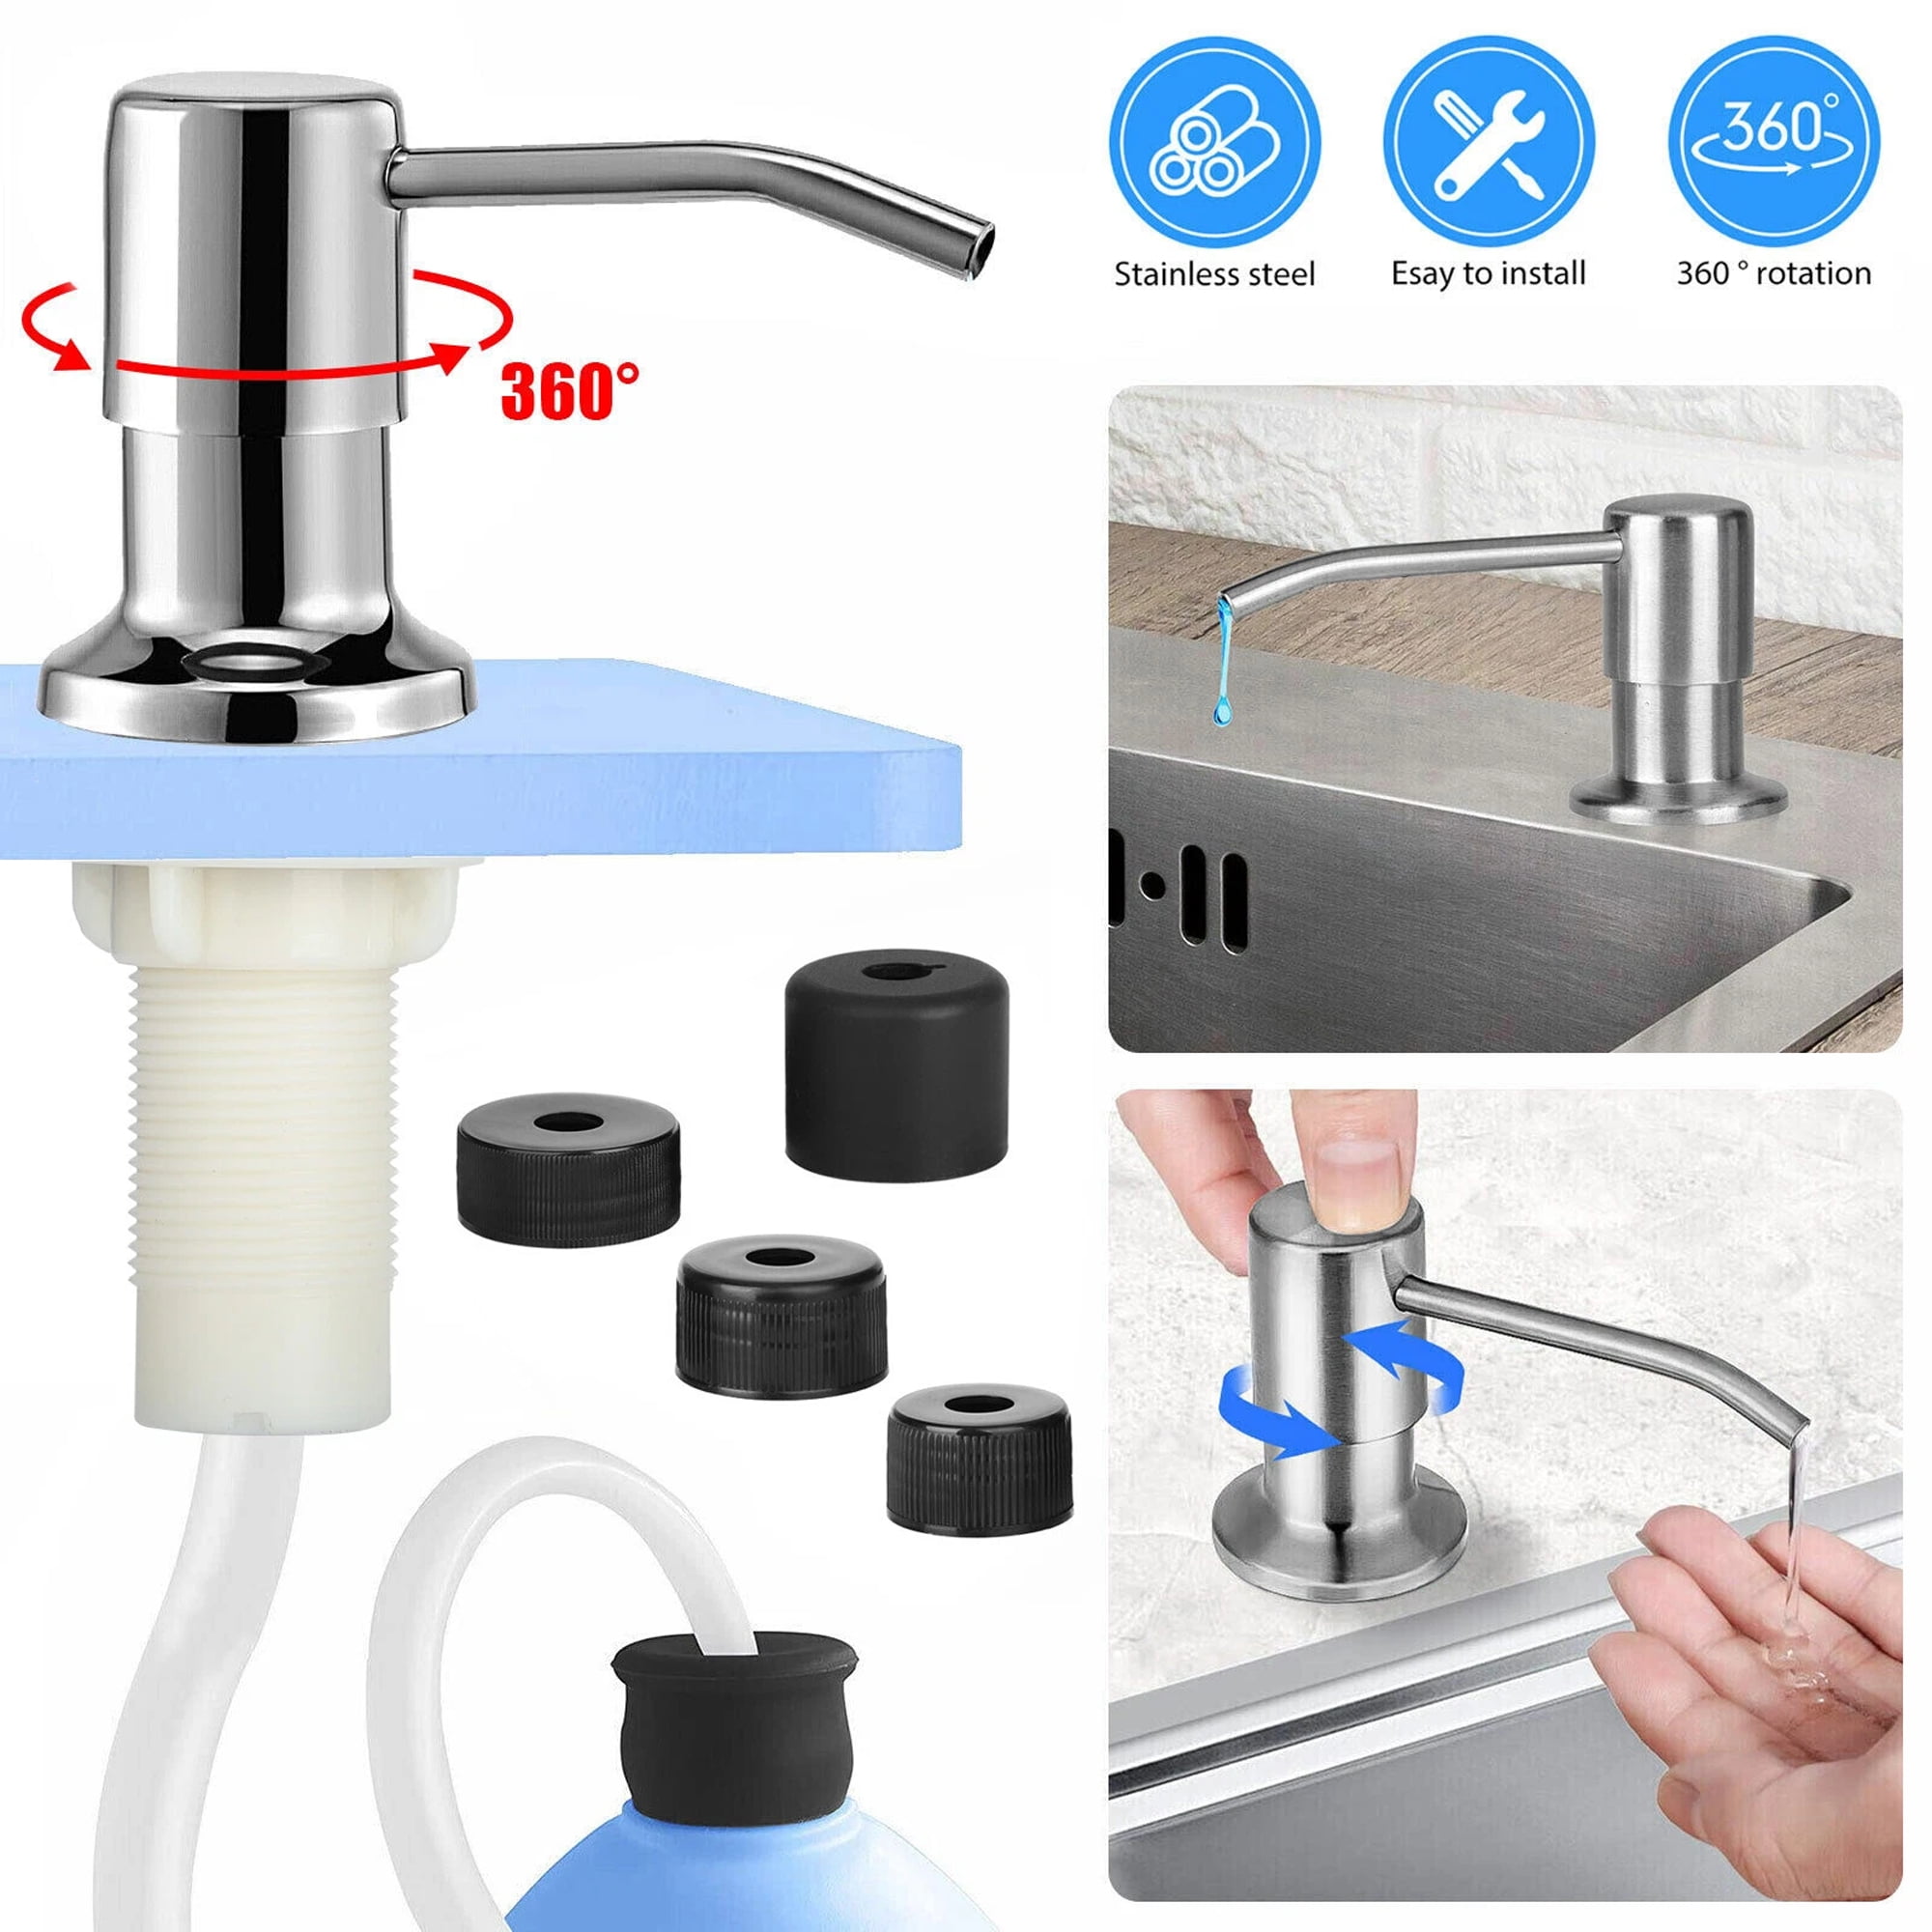
Credit: www.walmart.com
Maintenance Tips
Maintaining your kitchen sink soap dispenser is key to keeping it working smoothly and looking great. Simple upkeep can prevent frustrating clogs and leaks that might disrupt your daily routine. Let’s look at some easy maintenance tips that help your dispenser stay reliable over time.
Regular Cleaning
Cleaning your soap dispenser regularly stops buildup that can block the pump or cause unpleasant odors. Use warm water and mild dish soap to wipe the pump head and the soap container. Rinse thoroughly and let it dry completely before refilling.
Don’t forget to clean the nozzle where the soap comes out. This spot often collects dried soap, which can clog the flow. A quick wipe or gentle soak can keep it flowing smoothly.
Refilling The Soap
Refilling your dispenser correctly extends its lifespan and keeps soap dispensing evenly. Always use the right type of soap—liquid hand soap or dish soap works best. Avoid thick or gel soaps, which can clog the pump.
When refilling, pour slowly to avoid spills and overflows. Overfilling can cause soap to leak out or damage the pump mechanism. Have you noticed your dispenser working better after a careful refill?
Troubleshooting Common Issues
If your soap dispenser stops working, don’t rush to replace it. Check if the pump is stuck by pressing it repeatedly or soaking it in warm water to dissolve dried soap.
Leaks are often caused by loose connections under the sink or cracks in the container. Tighten any loose parts and inspect for damage regularly. Is your dispenser leaking? Sometimes a simple adjustment can fix the problem without tools.
Frequently Asked Questions
How Do I Install A Kitchen Sink Soap Dispenser?
To install, drill a hole near the sink faucet. Insert the dispenser pump through the hole. Secure it underneath with the mounting nut. Attach the soap bottle and connect the pump tube. Test by pressing the pump to ensure proper soap flow.
What Tools Are Needed To Install A Soap Dispenser?
You will need a drill with a hole saw bit, an adjustable wrench, a screwdriver, and a measuring tape. These tools help create the hole, tighten fittings, and ensure the dispenser fits correctly.
Can I Install A Soap Dispenser Without Drilling?
Yes, if your sink has an unused hole, use that. Otherwise, drilling is necessary for a secure fit and proper installation.
How Do I Maintain My Kitchen Sink Soap Dispenser?
Clean the pump regularly to prevent clogging. Refill the soap bottle when low. Wipe the dispenser surface with a damp cloth to keep it looking new.
Conclusion
Installing a kitchen sink soap dispenser is simple and saves space. Follow each step carefully for the best results. Use the right tools and take your time. A well-installed dispenser makes washing dishes easier and cleaner. Enjoy a neat and organized kitchen sink area.
Try it yourself and see the difference today.