

Are you tired of weak WiFi signals that leave you stuck in one corner of your home? You’re not alone.
A WiFi extender can be the simple fix you need to boost your connection and enjoy faster, more reliable internet everywhere. But how do you hook up a WiFi extender the right way? Don’t worry—this guide will walk you through every step clearly and quickly.
By the end, you’ll know exactly how to set it up and get your WiFi working stronger than ever. Keep reading to unlock a smoother online experience right now.
Choose The Right Wifi Extender
Choosing the right WiFi extender is key to improving your home or office network. The right device can boost your signal without causing new issues like slow speeds or connection drops. Take your time to pick one that fits your setup and needs.
Types Of Wifi Extenders
WiFi extenders come in different forms, each with its own benefits and drawbacks.
- Plug-in extenders:These are compact and plug directly into a wall socket. They are easy to install and ideal for small spaces.
- Desktop extenders:Larger and more powerful, these sit on a desk or shelf. They often offer better range and faster speeds.
- Mesh extenders:Part of a mesh system, these provide seamless coverage by creating a unified network. Great for larger homes or places with tricky layouts.
Think about where you need the boost and how much space you have. A plug-in extender might work well in a small apartment, but a mesh system could be better if your home has thick walls or multiple floors.
Compatibility With Your Router
Not all extenders work well with every router. You need to check compatibility before buying.
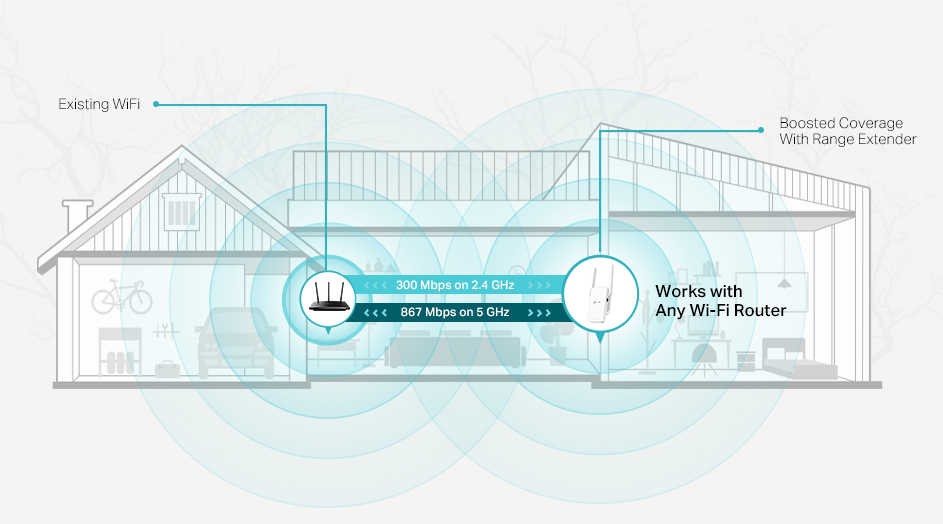
- Look at the frequency bands your router uses—2.4 GHz, 5 GHz, or both. Your extender should support the same bands.
- Check if your router uses specific standards like Wi-Fi 5 (802.11ac) or Wi-Fi 6 (802.11ax). Matching these ensures better performance.
- Some extenders work best with the same brand routers, but many are universal. Still, confirming this can save headaches later.
Have you ever bought an extender only to find it barely improved your connection? This often happens because of a mismatch in compatibility. Double-checking these details can save you time and money.
Find The Best Location
Finding the best location for your WiFi extender is crucial to boost your internet signal effectively. A well-placed extender can eliminate frustrating dead zones and deliver strong coverage throughout your space. This section helps you pinpoint where to set up your device for the best results.
Identify Dead Zones
Start by walking through your home or office with your phone or laptop to check WiFi signal strength in different areas. Notice where pages load slowly or connections drop—these spots are your dead zones. Understanding these weak points gives you a clear target for where the extender needs to reach.
Try simple speed test apps to measure internet speed room by room. You might be surprised to find dead zones in places you didn’t expect, like a corner office or a basement. Pinpointing these areas guides you to place your extender closer to them without losing connection to your main router.
Optimal Placement Tips
Place your WiFi extender somewhere between your router and the dead zones—not too far from the router, or it won’t receive a strong signal to repeat. Ideally, it should be in an open space, away from thick walls, metal objects, and appliances that can interfere with the signal.
- Keep it about halfway to the dead zone for balanced coverage.
- Elevate the extender, such as on a shelf, to avoid obstacles.
- Avoid corners, closets, or behind furniture where signals get trapped.
Ask yourself: does the extender still get a good signal where I want to put it? If not, move it closer to the router. Experimenting with locations often reveals a sweet spot you might not have considered initially.
Prepare Your Network
Before you plug in your WiFi extender, take a moment to prepare your network. This preparation ensures a smoother setup and better performance. Skipping this step can lead to connection issues or slower speeds later on.
Check Router Settings
Start by logging into your router’s admin panel. You can usually do this by typing your router’s IP address into a web browser.
Look for settings related to the wireless network, such as the SSID (network name) and password. Make sure you know these details because your extender will need to connect using them.
Also, check if your router has MAC address filtering turned on. If it does, you’ll need to add your extender’s MAC address to the allowed list, or it won’t connect properly.
Update Firmware
Outdated firmware can cause compatibility issues between your router and extender. Access the router’s admin panel and find the firmware update section.
If there’s a newer version available, download and install it. This can improve security and network stability.
Don’t forget to do the same for your WiFi extender once you have it. Updated firmware on both devices maximizes the chances of a seamless connection.
Connect The Wifi Extender
Connecting your WiFi extender properly is crucial to boost your wireless signal and eliminate dead zones in your home or office. This process can be straightforward if you follow the right steps and understand your extender’s setup options. Let’s dive into how you can get your extender up and running quickly and efficiently.
Power On The Extender
First, plug your WiFi extender into a power outlet near your router. This location helps the extender receive a strong signal during setup. Watch for the power indicator light to turn on—this confirms the device is ready for connection.
Some extenders have a power button, so make sure to press it if your device doesn’t turn on automatically. Waiting a minute or two before moving to the next step ensures the extender boots up fully and is prepared to connect.
Use Wps For Quick Setup
If your router and extender support WPS (Wi-Fi Protected Setup), this is the fastest way to connect them. Press the WPS button on your router first, then within two minutes, press the WPS button on your extender.
The extender’s indicator lights will blink, showing it’s trying to connect. Once a solid light appears, you know the connection is successful. This method avoids typing passwords and complicated configurations.
Have you tried WPS but still face connection issues? Sometimes, the buttons need to be pressed within a specific time window, so patience and timing are key.
Manual Setup Via Web Interface
If WPS isn’t an option or you want more control, use the extender’s web interface. Connect your device (phone, tablet, or laptop) to the extender’s default WiFi network—check the manual for the network name and password.
Open a browser and enter the extender’s IP address, usually something like 192.168.1.250, to access the setup page. From there, follow the on-screen instructions to select your home WiFi network and enter its password.
This method offers more customization, such as changing the extender’s network name or updating firmware. If you’ve ever wished for more control over your network setup, this is the way to get it done precisely how you want.
Configure Extender Settings
Access the extender’s settings through its web page or app. Enter your main WiFi details to link the extender to your network. Adjust settings like network name and password for easy connection.
Configuring your wifi extender settings ensures optimal performance and security. Proper configuration allows your extender to seamlessly integrate with your existing network. This step involves setting up network names, passwords, and security options. Ensuring these settings are correctly configured is crucial for strong connectivity and protection.Set Network Name And Password
Establish a unique network name for your extender. This helps distinguish it from other devices. Choose a name that is easy to remember. Ensure it is different from your main router’s name. Next, set a strong password. This protects your network from unauthorized access. Combine letters, numbers, and symbols. Make sure the password is at least eight characters long. Avoid using common words or phrases. Keep your password secure and private.Adjust Security Options
Select the best security protocol for your extender. WPA2 is recommended for most devices. It offers strong encryption and protection. Check your extender’s settings menu. Choose WPA2 from the available options. Some extenders offer additional security features. Look for features like guest networks or parental controls. Enable these if they suit your needs. Regularly update your extender’s firmware. This ensures you have the latest security patches. Keep your network safe and secure.
Credit: www.youtube.com
Test The Connection
Testing the connection after setting up your WiFi extender is crucial to ensure it actually improves your internet experience. It’s not enough to just see a signal; you want to know if that signal is strong and fast enough to meet your needs. This step helps you spot any issues early and adjust the extender’s position if necessary.
Verify Signal Strength
Start by checking the signal strength on your device where the extender is located. Look for the WiFi icon and note the number of bars or percentage signal shown.
You can also use apps like WiFi Analyzer (Android) or AirPort Utility (iOS) to get more detailed readings. These apps show the exact signal strength in dBm, helping you understand if the extender is placed optimally.
If the signal is weak, try moving the extender closer to your router or to a spot where the original WiFi signal is still decent. A small change in location can make a big difference in connection quality.
Run Speed Tests
Once the signal strength looks good, run speed tests to measure your internet speed through the extender. Use reliable services like Speedtest.net or Fast.com for consistent results.
Compare these speeds to those directly from your router to see if the extender is slowing down your connection. If the speed is significantly lower, reposition the extender or check for interference from other devices.
Remember to test at different times of the day since network congestion can affect results. Are you getting the speeds you expected? If not, tweaking the setup might be necessary to get the most out of your WiFi extender.
Troubleshoot Common Issues
Setting up a WiFi extender can sometimes hit unexpected bumps. Troubleshooting common issues helps you avoid frustration and get back online quickly. Let’s look at practical ways to fix problems that often pop up during or after installation.
Resetting The Extender
If your extender isn’t responding or seems stuck, a reset might be your best fix. Most extenders have a small reset button—press and hold it for about 10 seconds until the lights blink.
This clears previous settings and brings the device back to factory defaults. After resetting, you’ll need to set it up again, but this often solves connection problems that can’t be fixed by simple power cycling.
Have you ever tried resetting your device only to find it worked better than expected? That’s because resets clear out hidden glitches that build up over time.
Interference And Signal Problems
Interference can kill your extender’s performance. Devices like microwaves, cordless phones, and even thick walls can block or weaken signals.
Try moving your extender to a different spot, ideally halfway between your router and the area with poor WiFi. Avoid placing it near metal objects or appliances that emit wireless signals.
Another tip: check if your extender and router are using the same frequency band (2.4 GHz or 5 GHz). Mixing bands can cause confusion and reduce speed.
- Switch channels on your router to avoid crowded frequencies.
- Keep your extender away from large furniture or mirrors.
- Use apps or tools to scan for signal strength and interference.
Have you noticed your WiFi dropping only in certain rooms? This is often a sign of interference, and adjusting placement can make a big difference.

Credit: www.youtube.com
Maintain Your Wifi Extender
Maintaining your WiFi extender is crucial to ensuring consistent and reliable internet access throughout your home. Think of it like tending to a garden; regular care and attention can prevent issues and enhance performance. Just like a well-tended plant flourishes, your WiFi extender can deliver optimal results with a little maintenance. Let’s dive into some practical steps you can take to keep your WiFi extender performing at its best.
Regular Updates
Keeping your WiFi extender’s firmware up to date is essential. Manufacturers often release updates to improve performance and security. Check the manufacturer’s website or your device’s settings for any available updates. Updating is usually a straightforward process that can be done through the extender’s interface.
Don’t ignore those update notifications. They are often packed with enhancements that can make a noticeable difference in your WiFi experience. You wouldn’t skip an oil change on your car, so why skip updates for your extender?
Repositioning For Best Performance
The placement of your WiFi extender can significantly affect its performance. Experiment with different locations to find the sweet spot. Ideally, it should be halfway between your router and the area where you need better coverage.
Walls, metal objects, and electronics can interfere with the signal. If your extender is next to a microwave or thick wall, you might face connectivity issues. Find a spot that’s open and away from signal-blocking obstacles.
Ever moved furniture around and realized your living room had more space than you thought? The same goes for your WiFi extender. Moving it just a few feet can make all the difference. Where have you placed your extender, and is it the best spot?
Credit: www.tp-link.com
Frequently Asked Questions
How Do I Connect A Wifi Extender To My Router?
To connect a WiFi extender, plug it into a power outlet near your router. Press the WPS button on both devices. Wait for the extender to link to the router’s signal. This boosts your WiFi range effectively and quickly.
Where Should I Place My Wifi Extender For Best Results?
Place your WiFi extender halfway between your router and the weak signal area. Ensure it’s within the router’s range for a strong connection. Avoid obstacles like walls or metal objects to maximize signal strength and coverage.
Can I Use Any Wifi Extender With My Router?
Most WiFi extenders work with any router, regardless of brand. Check compatibility for dual-band extenders to match your router’s frequency (2. 4GHz or 5GHz). This ensures optimal performance and seamless network extension.
How Do I Troubleshoot If My Wifi Extender Isn’t Connecting?
Restart both your router and extender to refresh connections. Check if the extender is within range. Reset the extender if needed and repeat the setup process. Ensure your router’s firmware is up to date for smooth operation.
Conclusion
Setting up a WiFi extender can improve your internet signal. Place it where your router’s signal is still strong. Follow the steps carefully to connect it to your network. This will help reduce dead zones in your home or office.
Enjoy faster and more reliable WiFi in every room. Remember to test the connection after setup. A strong WiFi signal makes browsing, streaming, and working easier. Keep your extender updated for the best performance. Simple steps, better internet—no more weak spots.