

Are you looking for a simple way to cook juicy, flavorful pork tenderloin that melts in your mouth? Cooking pork tenderloin in a Dutch oven is the secret to achieving tender meat with rich, deep flavors.
Whether you’re a beginner or just want to perfect your cooking skills, this method lets you create a delicious meal with minimal effort. Keep reading, and you’ll discover easy steps and tips that will make your pork tenderloin the star of your next dinner.
Get ready to impress yourself and everyone at your table!

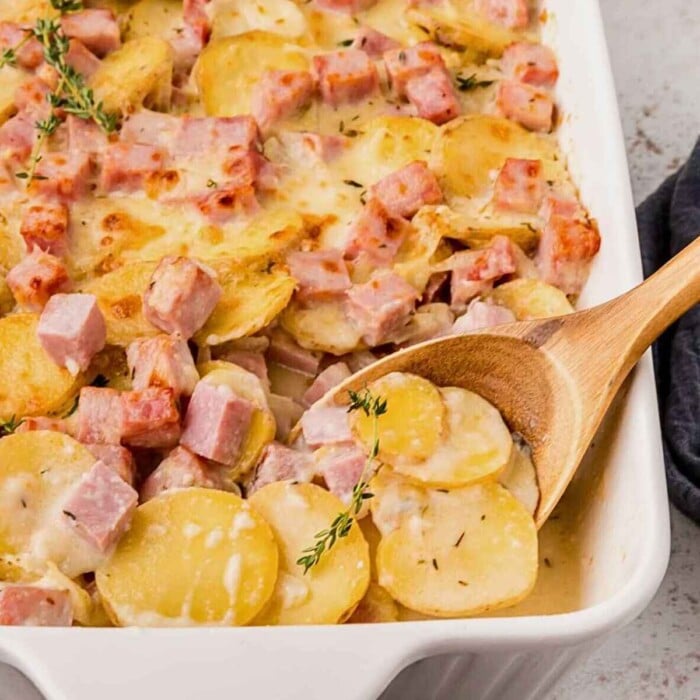
Credit: cz.pinterest.com
Choosing The Right Pork Tenderloin
Choosing the right pork tenderloin is key to making your Dutch oven meal a success. The quality and freshness of the meat affect both flavor and texture. Before you start cooking, consider these important factors to get the best results.
Fresh Vs. Frozen Options
Fresh pork tenderloin usually offers better texture and flavor. It’s easier to cook evenly and tends to be juicier. However, frozen pork can be just as good if thawed properly.
Look for packaging dates when choosing fresh pork. If you only have frozen meat available, thaw it slowly in the fridge for at least 24 hours. Avoid quick thawing in the microwave, as it can affect the meat’s quality.
Have you noticed how fresh pork often has a slight pink color with firm texture? Frozen pork might look duller but can still deliver great taste if handled right.
Size And Quality Tips
Pork tenderloins typically weigh between 1 to 1.5 pounds. Pick one that matches the number of servings you need. Smaller tenderloins cook faster and may dry out if overcooked.
Check the meat for a consistent pink color and minimal marbling. Too much fat can affect cooking time, while too little may reduce tenderness. Choose tenderloins that feel firm but slightly springy to the touch.
- Look for smooth, unblemished surfaces on the meat.
- Avoid tenderloins with a gray or brown tint.
- Consider organic or pasture-raised options for better flavor.
Have you ever bought pork that felt too soft or looked uneven? That’s usually a sign of lower quality, which can impact your final dish.
Preparing The Pork Tenderloin
Preparing the pork tenderloin is your first chance to set the stage for a delicious meal. How you handle the meat before it hits the Dutch oven can make a huge difference in flavor and texture. Taking a few extra minutes to clean and season the tenderloin properly will pay off when you slice into a juicy, flavorful roast.
Trimming And Cleaning
Start by removing any silver skin—the thin, silvery membrane that doesn’t break down during cooking. It can make the meat tough if left on.
Use a sharp knife to carefully slide under the silver skin and pull it away. You’ll also want to trim off any excess fat, but leave a thin layer to keep the pork moist.
Rinse the tenderloin under cold water and pat it dry with paper towels. Drying the meat helps to achieve a good sear later on, locking in juices.
Seasoning Techniques
Seasoning your pork tenderloin isn’t just about salt and pepper. Think about layering flavors that complement pork’s natural sweetness.
- Start with a generous sprinkle of kosher salt and freshly ground black pepper.
- Add garlic powder, smoked paprika, or even a pinch of cayenne for depth.
- For a fresh touch, rub the meat with minced herbs like rosemary or thyme.
Don’t forget to gently press the seasoning into the meat—this helps it stick and penetrate during cooking.
Have you tried letting the seasoned tenderloin rest for 15 minutes before cooking? It allows the flavors to soak in and the meat to come closer to room temperature, ensuring even cooking.
Selecting The Dutch Oven
Choosing the right Dutch oven is key to cooking a juicy and tender pork tenderloin. The pot’s material and size affect how evenly your meat cooks and how easy it is to handle. You want a Dutch oven that holds heat well without making the cooking process complicated.
Material Choices
Cast iron is the most popular material for Dutch ovens because it retains heat consistently. Enamel-coated cast iron offers the same heat retention but is easier to clean and doesn’t require seasoning. If you prefer something lighter, aluminum Dutch ovens heat quickly but might not hold heat as evenly.
Think about how often you plan to use your Dutch oven. If you cook pork tenderloin regularly, investing in a high-quality enameled cast iron pot can make a big difference. I once used a cheap aluminum pot and ended up with unevenly cooked meat. Switching to cast iron gave me perfectly browned tenderloin every time.
Size Recommendations
Size matters because your pork tenderloin needs space to cook evenly without crowding. A 5 to 6-quart Dutch oven is usually perfect for a standard 1 to 1.5-pound tenderloin. It’s large enough to hold the meat and some vegetables, but not so big that heat distribution suffers.
If you’re cooking for more people or want to add sides in the same pot, consider an 7-quart or larger Dutch oven. Just be cautious—too large a pot might dry out your tenderloin because the heat spreads too thin. What size Dutch oven do you currently use? Could adjusting it change your cooking results?
Credit: quichemygrits.com
Searing The Pork Tenderloin
Searing the pork tenderloin is a crucial step that locks in the juices and builds a rich, caramelized crust. This process adds depth to the flavor and sets the stage for a tender, juicy roast. Getting the sear just right can transform your dish from ordinary to unforgettable.
Heat Settings
Start by preheating your Dutch oven over medium-high heat. Too low a temperature won’t create that beautiful crust, while too high can burn the surface before the inside cooks. Aim for a steady, hot surface that sizzles when the pork hits the pan.
Make sure the pot is fully heated before adding oil—this prevents sticking and helps the meat brown evenly. Use an oil with a high smoke point, like canola or avocado oil. Have your vent hood or windows open; the searing process can produce some smoke.
Searing Tips For Flavor
Pat your pork tenderloin dry with paper towels before searing. Moisture is the enemy of a good crust. Season the meat generously with salt and pepper right before placing it in the hot Dutch oven.
Don’t move the pork around once it’s in the pot. Let it sit for 3 to 4 minutes on each side to develop a deep brown crust. If you try to flip it too early, the meat will stick and tear.
Use tongs to turn the tenderloin gently, ensuring you sear all sides—including the ends. This creates a uniform crust and locks in flavor throughout.
Have you noticed how a perfectly seared crust changes the entire meal? It’s not just about looks—it’s about flavor that you can taste in every bite.
Cooking Methods In Dutch Oven
The Dutch oven is a versatile tool for cooking pork tenderloin. It offers two main cooking styles that bring out different flavors and textures. Each method suits different tastes and time schedules. Both preserve the pork’s moisture and tenderness. Let’s explore these cooking methods in detail.
Oven Roasting
Oven roasting in a Dutch oven gives the pork a crispy outside. Start by preheating the oven to 400°F (200°C). Brown the tenderloin on all sides in the Dutch oven on the stove. Then, place the Dutch oven in the oven to roast. This method cooks the pork evenly and seals in juices. Roasting takes about 20-30 minutes depending on the tenderloin size. Rest the meat for 5-10 minutes before slicing. The result is tender meat with a golden crust.
Stovetop Braising
Stovetop braising uses low heat and liquid to cook pork slowly. First, sear the tenderloin in the Dutch oven until browned. Add broth, wine, or a mix of liquids until halfway up the pork. Cover the Dutch oven with its lid. Simmer gently on low heat for 45 minutes to 1 hour. This method makes the pork very tender and flavorful. The slow cooking breaks down tough fibers. The liquid also becomes a delicious sauce to serve with the pork.
Adding Flavors And Aromatics
Adding flavors and aromatics to your pork tenderloin in a Dutch oven is key to turning a simple cut of meat into a memorable meal. These ingredients not only enhance the taste but also create inviting aromas that fill your kitchen. Think about the last time you cooked with fresh herbs or sizzling spices—didn’t it make the cooking experience more enjoyable?
Herbs And Spices
Choose herbs that complement pork’s mild flavor without overpowering it. Rosemary and thyme are classic choices that add earthiness and a hint of pine-like freshness. Sage brings a slightly peppery note, while garlic powder or minced garlic provides a robust background flavor.
You can add whole sprigs of herbs right into the Dutch oven or chop them finely to rub directly onto the pork. Don’t forget to sprinkle some black pepper and a touch of smoked paprika for warmth and color. Have you tried marinating your tenderloin with a blend of crushed fennel seeds and cumin? It’s a game-changer that adds unexpected depth.
Vegetable Pairings
Vegetables aren’t just side dishes; they infuse the cooking liquid with flavor that the pork absorbs during braising. Onions, carrots, and celery create a classic flavor base known as mirepoix, which adds sweetness and aroma. Adding quartered apples or pears can introduce a pleasant fruity contrast that balances the savory notes.
Consider tossing in mushrooms for an earthy richness or bell peppers for a subtle sweetness. Root vegetables like parsnips or sweet potatoes also hold up well to slow cooking and soak up those delicious juices. What vegetables do you have on hand that could add both texture and flavor to your dish?
Monitoring Temperature And Doneness
Monitoring the temperature and doneness of pork tenderloin is essential for a tender and juicy result. Overcooking can dry the meat, while undercooking poses health risks. Cooking in a Dutch oven allows even heat distribution, but checking the internal temperature ensures safety and taste.
Using the right tools and knowing the signs of doneness help achieve perfect pork every time. Pay attention to the meat’s feel and color as you cook. This section explains how to monitor pork tenderloin’s temperature and doneness effectively.
Using A Meat Thermometer
A meat thermometer is the best way to check pork’s doneness. Insert it into the thickest part of the tenderloin without touching bone or fat. The ideal internal temperature for pork tenderloin is 145°F (63°C). At this temperature, the meat stays juicy and safe to eat.
Keep the thermometer handy and check the temperature near the end of cooking. Remove the pork from the Dutch oven once it reaches 145°F. Let it rest for at least 3 minutes. The temperature will rise slightly, and juices will redistribute for better flavor.
Signs Of Perfectly Cooked Pork
Besides using a thermometer, watch for these signs of doneness:
- Firm but slightly springy texture when pressed.
- Juices run clear, not pink or red.
- Meat color changes from pink to a light white or pale pink inside.
- A pleasant aroma without any raw smell.
These visual and tactile clues help confirm the pork is cooked well. Combining these signs with temperature checks ensures a delicious pork tenderloin every time.
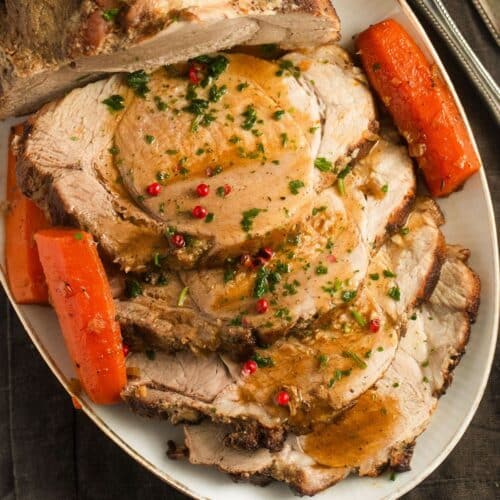
Credit: whereismyspoon.co
Resting And Serving Tips
Resting and serving pork tenderloin properly enhances its flavor and texture. Allowing the meat to rest lets juices settle. This step prevents dry slices and keeps the tenderloin moist. Serving with thoughtful presentation makes the meal inviting and enjoyable.
Resting Time Importance
Rest the pork tenderloin for at least 10 minutes after cooking. Cover it loosely with foil to retain warmth. Resting allows juices to redistribute inside the meat. Cutting too soon causes the juices to run out. This leads to a dry and less flavorful dish. A properly rested tenderloin stays juicy and tender.
Presentation Ideas
Slice the pork tenderloin against the grain for tender pieces. Arrange slices neatly on a warm serving platter. Garnish with fresh herbs like rosemary or thyme for color and aroma. Serve with sides such as roasted vegetables or mashed potatoes. Use a drizzle of pan sauce or gravy to add shine and taste.
Cleaning And Caring For Your Dutch Oven
Your Dutch oven is more than just a cooking tool; it’s an investment that deserves proper care. Cleaning and maintaining it correctly ensures every pork tenderloin you cook tastes just as good as the first time. How often do you think about the care routine after pulling a delicious meal from your Dutch oven?
Post-cooking Cleanup
Once you’ve finished cooking, allow your Dutch oven to cool down naturally. Avoid plunging it into cold water as this can cause it to crack or warp.
Use warm water and a soft brush or sponge to remove food residue. Skip the soap if your Dutch oven is cast iron with seasoning; soap can strip the seasoning layer.
Stubborn bits can be loosened by soaking the pot in warm water for a short time. If you encounter stuck-on food, try scrubbing with coarse salt and a damp cloth—it works wonders without damaging the surface.
Maintenance For Longevity
After cleaning, dry your Dutch oven thoroughly to prevent rust. You can place it on low heat for a few minutes to ensure all moisture evaporates.
For cast iron, apply a thin layer of cooking oil inside and out to maintain the seasoning and protect the surface. Store your Dutch oven with the lid slightly ajar to allow air circulation and avoid moisture buildup.
Have you checked your Dutch oven for signs of wear lately? Regularly inspect for chips or cracks in the enamel, which can affect cooking performance and safety.
Frequently Asked Questions
How Long To Cook Pork Tenderloin In A Dutch Oven?
Cook pork tenderloin in a Dutch oven for 25-30 minutes. Use medium heat and check for an internal temperature of 145°F (63°C). Rest the meat for 5 minutes before slicing to keep it juicy and tender.
What Temperature Should Dutch Oven Be For Pork?
Preheat your Dutch oven to medium-high heat, around 350°F (175°C). This temperature sears the pork and locks in juices. Then lower the heat to medium-low for slow cooking to ensure even doneness and tenderness.
Can I Cook Frozen Pork Tenderloin In A Dutch Oven?
It’s best to thaw pork tenderloin before cooking for even heat distribution. Cooking frozen meat can lead to uneven cooking and longer cooking times. Always thaw in the refrigerator overnight for safe and tender results.
Should I Sear Pork Tenderloin Before Dutch Oven Cooking?
Yes, searing pork tenderloin in the Dutch oven before slow cooking enhances flavor. It creates a delicious crust and seals juices inside. Sear each side for 2-3 minutes on medium-high heat before adding liquids or vegetables.
Conclusion
Cooking pork tenderloin in a Dutch oven brings great taste and ease. The slow heat keeps the meat juicy and tender. You only need a few simple steps to get it right. This method works well for any weeknight dinner.
Try adding your favorite herbs and vegetables. Enjoy a delicious meal with little effort. Give this recipe a try soon. You will love the results.